Sunday, August 6, 2017

Solar power monitoring on Raspberry Pi/Linux

I've had solar panels installed since 2012 after my wife and I bought our first home. I have always been interested in monitoring our power usage as well as solar power production and trying to optimise/minimise use. It was relatively easy to get data from our Power-One Aurora 2kW photovoltaic inverter, and upload that via a Raspberry Pi (v2) to PVoutput.org.

A full day's live output after it was working again

This worked fairly well with only minor hiccups from mid-2014 through to early 2016 when the Pi started having regular issues, and eventually stopped booting altogether in August. The SD card basically just wore out, I used ddrescue to recover it with < 100 kB missing but apparently those were important bytes. I have finally gotten around to recovering it, having to reverse engineer my own setup, so I am documenting it here. I will also cover how to make it more resilient.

I stalled on monitoring the power usage for the house, but recently discovered some progress in this area, which can be a whole other post.

You will need


This guide is for my setup as follows, yours may differ:
  • Aurora PV inverters with either
    • an internal RS485 serial port connection (may void warranty? do your own research) 
    • an external USB port (larger models, probably indoor only) - though I have not used one
  • Relevant hardware to connect
    • in my case I used a long Cat 5 ethernet cable to carry the signals from the inverter
    • an RS485 to USB adapter
  • Raspberry Pi or other Linux-based host you're going to connect it to, ideally low power
    • With an 8GB+ SD card, a good one, not no-name brand
    • Ideally one that does wear-leveling, but I was unable to find any reliable info
    • With Raspbian with desktop installed, configured and updated
  • You aren't afraid to install packages and compile things
  • Posting data to PVoutput.org or wherever, but this part is all software and much easier, plus my setup also logs locally. 
If you wanted to use a Windows host, there are actually more software options for Aurora inverters such as PVBeanCounter, but I don't want to run anything 24/7 that runs Windows.

Caveats


  • The ONLY ready-to-go software I could find which supported Aurora, ran on Linux, and posted to PVoutput.org is called Aurora Monitor which:
    • hasn't been updated in years, but seems rock-solid anyway
    • is open source (GPLv3)
    • requires a desktop! Although all I wanted was to log the data, it has a GUI, so I have to run the desktop which makes this a little more complicated and inefficient :( 
    • however you don't need to connect a monitor permanently 
    • also logs its data to disk, at a rate of about 350 kB per day, so make sure you have spare space or setup log rotation. 
  • The above means you need a desktop Linux distro, I used Raspbian
  • ... and the current Raspbian with Desktop is 4.7GB so you need an 8GB SD card
  • Don't put the Pi anywhere that's hard to get to as you may occasionally need to reboot it or repair the SD card
  • RS485 (multidrop serial) is not the same as regular RS232 (single) serial. You DO need the right USB device, which basically converts it to RS232. On the plus side, if you have multiple inverters, you can daisy chain them on the same line, but I think the unit I have only supports one connection. 
    • Mine is an FTDI idVendor=0403, idProduct=6001 "FT232R USB UART" 
    • The first one I bought was the cheapest possible and didn't last long, get FTDI

Steps


Read all these instructions before you start to make sure you aren't missing or misunderstanding anything!

Connect cable to RS485 USB adapter
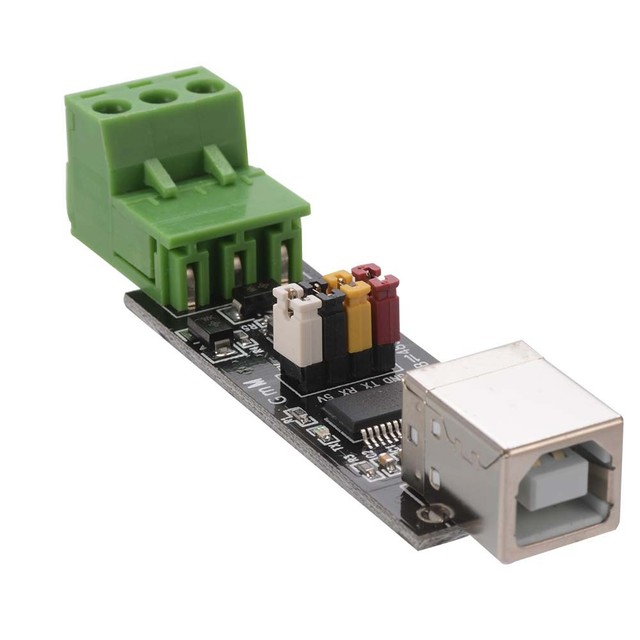

Here's a stock photo of the same type of adapter I have, for example search ebay for "USB To TTL RS485 Serial Adapter FTDI FT232RL". It simply has screw terminals for the wires. Keep track of which is which for Rx/Tx.
USB To TTL RS485 Serial Converter Adapter FTDI FT232RL Downloader Module TE661
For more photos of my setup look further down.

Connect to PV Inverter

WARNINGS!
  • You must have an electrician do this! 
  • This may void your warranty! 
  • Follow the manufacturer's instructions to turn off ALL power to the inverter at the meter box and then PV array! 
  • Make sure any entrances to the device are sealed up waterproof and insect-proof!
  • Leave the other end of the cable disconnected from anything and with no wires touching while you do this end! 
  • Do your own research! Don't blame me if any of this breaks or costs you money!
  • If you don't understand exactly what this is about and what all this means, just stop now! 

This photo shows the screw-terminals for the serial connection. 
  1. Run an appropriately weather shielded cable with enough wires from wherever your Pi is going to live, in through the holes in the bottom (replace or retrofit the hole cover as needed)
  2. Ensure it has proper strain relief (simple way: tie a loose knot around a small non-conductive object) so it won't pull out and has enough wire to easily reach, but not fill up the unit
  3. Wire them up, ensure any spare wires are cut off and won't touch anything
  4. The terminator switch is used for multidrop cables, should be enabled only on the last unit. I think it wasn't changed. 
  5. Close up the box
  6. Power on the unit following correct process (power off in reverse) 
  7. Connect up the other end to your RS486 to USB adapter and ensure it works (may have to fiddle around with rx vs tx, etc) - exercise left up to reader
  8. Power off again
  9. Waterproof the cable entrance
  10. Power back on

Compiling Aurora Monitor

These assume you are familiar with Raspberry Pi, Linux (Raspbian), and have that set up already.
  1. Download Aurora Monitor to the Pi and unzip it 
  2. It has binaries for 32 bit and 64 bit but you need to compile it for ARM
    1. run "sudo apt-get install build-essential libwxgtk2.8-0 libwxgtk2.8-dev"
    2. run "cd /src"
    3. run "make"
    4. wait about 15 minutes (no, really)
    5. "auroramon" binary is built, you can move it wherever you want
  3. Run desktop if you haven't already
  4. Run auroramon and ensure it works, but of course it won't have data.

Set up software

This part can only be done when the sun is out and the unit is producing power.

For more help and screenshots see http://auroramonitor.sourceforge.net/ but here is a quick rundown:
  1. Plug in your USB adapter and configure the program:
    1. Serial port to use (check "ls /dev/tty*" it's probably ttyUSB0 if there's only one) 
    2. Location (lat/long) for automatic adjustment to sunrise/sunset and azimuth
    3. Solar panel direction and angle if known (I don't)
    4. Etc etc 
  2. Click Inverter Status in the menu to ensure it's connected, you should also see some numbers in the boxes at the bottom 
  3. After a few minutes there should be some data points on the chart! 
  4. Uploading to PVoutput.org: get a free account and go to Account Settings to get your API key
  5. Wait a few minutes to see your live data appear on your chart online! 

Resiliency

  • Ensure the desktop starts on boot: run "sudo raspi-config" and go through the menus
  • Make auroramonitor start with the desktop: https://raspberrypi.stackexchange.com/a/45554/4226
  • For the SD card: optionally, reduce the root partition size a bit to leave room for remapped bad sectors (not sure if this will actually work); I left 256 MB at the end, using GParted on my PC 

After 3 years my USB adapter was getting a bit dusty, so to protect it from dust, insects or damage I put it in a plastic enclosure:

See my awesome screw-terminal wire protection?

Classy container
Due to the frosted plastic it has a cool glow!

Potential improvements

  • Back up the Pi regularly so you don't get in the same situation I did, making recovery harder
  • If you want things to be tidier, and you don't mind sacrificing your Pi and also making debugging harder, just run the Pi inside your meter box with Wifi. You will need an electrician to install a power point though. 
    • Ensure you don't expose any electronics, in Australia we have big spiders and geckos that love my meter box 
  • A dedicated Arduino with RS485 adapter and ESP8266 wifi would be cheaper, entirely sufficient and maybe even more resilient if all you want to do is send data to PVoutput.org or anywhere else 
  • Link this setup with emonCMS (openenergymonitor.org) and/or home-automation.io 
  • If all your host does is log Solar, it might as well shut down overnight, you could use a shutdown script after dark (don't just power it off!!) and an external timer to turn it off and back on before dawn. 

Wednesday, December 23, 2015

Just putting this here so I never lose it... 
Spider-man brain tumor truck nemesis FAPPO!

Sunday, August 3, 2014

Hidden trick to programming ATTiny with USBasp

Just a quick note, this might have been obvious to other more experienced users, but I thought I had bought some dead ATTiny85 chips on ebay. The first two had worked fine, and then the next three wouldn't respond. Then I got some brand new ATTiny84 chips and couldn't get any of them to work, so I knew there must be a trick.

The short answer it turns out, is that you need to short J3 on the USBasp. Mine didn't even have headers on it, so I had to solder on some pins. This makes it work for 1MHz chips, which takes 8x longer to write. Once the reprogrammable fuses are set for 8MHz you can remove this jumper and write much faster. This is most easily done by writing a program with the Arduino IDE or even just using "Burn Bootloader" which just writes an empty bootloader script and sets the fuses.

The chips should come from the factory preset to 1MHz and all the other defaults, but I guess the first two chips I tried had already been used, as I didn't need the jumper? I worried that the other chips might be dead, or had their fuses set so you couldn't write to them, and looked into devices for fixing them. I decided it was cheaper to just get more chips than such a device. So now I have a surplus!

There was no description of J3 on the USBasp silkscreen and there had been no instructions with the device. I had wondered what it did but assumed it was for special cases or to do with reflashing the device itself (as is J2).

I found this trick buried as a small note in an instructable, http://www.instructables.com/id/The-Idiots-Guide-to-Programming-AVRs-on-the-Chea/step4/Setting-up-your-not-so-micro-computer/

Hope this helps someone like me!

Monday, September 24, 2012

Migrating to SSD: a faster and more reliable method

I recently bought an SSD and discovered there are several posts about specifically migrating a Windows 7 install from HDD to SSD, which it turns out is a little more tricky than just one HDD to a larger one. The drive has to be "aligned" to sector boundaries like a HDD is, for maximum speed, TRIM needs to be enabled, the system needs to know it's an SSD, the boot sector needs to be restored, etc. These are things that Windows 7 will set up automatically when fresh installing, but when migrating, they have to be set up manually. So they go through a number of steps to make this happen.

I found that most of those options were already set correctly, but unfortunately it didn't seem to help, I couldn't get booting. The Windows installer couldn't find the drive to repair. So I came up with a simpler method which is sure to set up your SSD correctly and therefore get you up and running faster.

This is the short answer, if you're already familiar with this process:
* install Windows 7 on the SSD, letting the installer partition it
* clone your old system partition over the new SSD system partition
* done. (disconnect your old hard drive before booting from SSD the first time)

The longer version, with more general migration advice, follows.

For reference, these are the articles I used:
http://arga.wordpress.com/2010/04/24/how-to-properly-clone-a-windows-7-system-partition-with-clonezilla/
http://www.howtogeek.com/97242/how-to-migrate-windows-7-to-a-solid-state-drive/

Prepare:
* your favourite cloning utility on USB or CD (I used clonezilla on a live USB stick, but it isn't the most user-friendly if you're not familiar with hard drive partitioning)
* install the SSD in your computer, ensure you can access it - try formatting it and throwing some files on it. If a laptop, you'll have to use an external USB connector and swap drives after cloning.
* get your Windows 7 Install media ready


Method:

  1. Make a fresh windows 7 install onto the SSD - it takes about 15 minutes. Delete the partitions on it and let Windows take over the partitioning, unless you have a particular scheme in mind. Ensure that you can boot to the desktop. 
    1. Optionally clone the fresh install to an image in case you want it back some time later - but cloning probably takes as long as a fresh install anyway.
  2. Clone your old partition onto the SSD's partition, overwriting the install you just did. Don't touch the boot sector or partition table.
  3. Shut down, disconnect the old hard drive, so you don't boot the old one, and also so windows doesn't get confused about drive letters. You can reconnect it later, after booting the cloned partition once, if you have other partitions or whatever that you want to recover, or to wipe it, etc. 
  4. Ensure BIOS is booting from SSD
  5. Boot into windows on your SSD!
  6. Ensure the system drive letter is C (if you boot with your old hard drive connected, it will keep that as C and the one you just booted off will get assigned another letter - which gets very confusing, and breaks some programs)
    1. Optionally shut down and reconnect the old hard drive, in case you want more partitions, or to format and re-use it. 

So if all goes well, that should only take about an hour, including prepping a usb stick to boot clonezilla. 15 minutes to install fresh, 15-20 minutes to clone, plus a bit of time for rebooting, disconnecting and reconnecting hard drives, tweaking BIOS etc.

Let me know if you try this and if it works, or if not why not.

Monday, June 27, 2011

Electric placemats

My fiancee suggested a project for me - make placemats that would keep plates warm throughout dinner, and therefore keep the meal palatable (she really doesn't like cold food).

I see two ways to do this - induction heating, and a ceramic thermal mass with heating. Leaving aside the issues common to both, ie how much power would be needed, how to control the temperature, and running power to them on the kitchen table (or whether batteries are even feasible), let's examine the options.

Induction heating

There are some fancy stoves that do this. From memory, it basically electromagnetically induces a current in a metal body with AC, which heats up from all the eddy currents. This requires pots and pans which are suitable for induction, but on the other hand, it can be more safe because you can put a plastic container or your hand on the stove and nothing gets hot, as long as it isn't already hot from heating something before.
However, there are some downsides. Few plates are made of metal, so you'd need special plates, or rather a plate and platemat set, for every person eating. Cutlery is also metal, so it would probably heat up too - you wouldn't want to leave your cutlery on the plate for a few minutes, then pick it up again burning hot! Finally, you have to run AC to your placemats, which means thinner cables than DC, but more dangerous current to have around drinks and knives.


Heated ceramic

I imagine a ceramic insulator/thermal mass around nichrome wire, or tungsten heating element such as used in electric frypans. The base would need to be a good thermal insulator, possibly wood, to stop it from burning the table, which might make it rather thick. You could use AC or DC power. You can use any plates that can stand being warmed.


Let's summarise:

Induction heating - pros:
Safer heating mechanism
Heats faster
Thinner cables
Thinner placemat?

Induction heating - cons:
Requires plate + placemat set
Cutlery is heated too
More dangerous AC

Heated ceramic - pros:
Can use any suitable plates
Choice of AC or DC (DC would have thicker cables, but is safer)


Heated ceramic - cons:
Probably thicker placemats due to insulation
Takes more time to cool off
Heavier?


I'm not sure which of these approaches would use more power, or be more costly to produce. Then there is heating control, but if I solve my electric frypan heating problem first, I can use that solution.

I'm going to ask Hackerspace Brisbane for their thoughts. 

A better electric frypan heater control

Cooking is based on applying heat to food, ideally in a consistent, controlled way. Electric frypans suck at consistent heating. This is because they use a cheap thermistor, and dump all their power into the element until it reaches the set temperature, and then *turn off* completely, so your steak stops sizzling, until the temp drops enough and it turns the element back on again.

For that matter, some electric stoves also suffer the same problem, but because of their thermal mass the temperature doesn't drop so much.

Gas stoves are highly regarded by cooks, because you can finely control the amount of heating, and it doesn't turn itself on and off randomly at inconvenient times! But gas stoves are more complicated, expensive, require maintenance (replacing gas bottles), and some people are scared of using gas.

Why should electric heating work so badly?? Don't we control electricity? Isn't it supposed to make things more flexible?

Well there is a simple, well-known way to control electric power for motors, heating, etc: Pulse Width Modulation. I don't know why frypan makers don't use it, except that it's a bit more complicated and maybe more expensive. But you vary the % of time you are heating, and you can do it very fast. It changes the control mechanism from desired temperature to % of power to output. And you can do this pretty easily with a 555 timer IC, make the dial control the pulse width, and pass the AC current with a bigass MOSFET, SCR, or relay - solid state if possible, or there will be lots of clicking.

My friend Dylan points out that changing the dial to increase the power just means the % is increased, which is different from the existing functionality where it will dump all power until it reaches that temperature. In short, this means it will take a lot longer to reach the desired increase in temp (or a drop). I'm not sure how to approach this problem. Perhaps a hybrid thermistor and PWM solution, where some fuzzy logic figures out what PWM value to use to maintain the temperature, and nudges it up and down if the temp changes. That immediately brings to mind the idea of using a microcontroller like AVR (eg Arduino), instead of 555 Timer and so on, but I'd like to avoid that, at least in the final product. Still, it could be an interesting project!

Monday, April 25, 2011

Find MechWarrior: Living Legends servers

Unfortunately, not a lot of people regularly play this fantastic total conversion for Crysis and Crysis Wars. Whenever they release an update, a bunch of people flood to the servers to try it out, then drop off. This is especially bothersome in Australia, because you can't get a decent number of people (> 5) going on a local server. Thankfully the lag compensation is quite good because I am able to play on US and EU servers with ~230ms ping.

That said, you usually have to drop into the game just to see if anyone, anywhere, is playing. I found a simple way to find out how many people were playing: GameTracker. That might seem obvious, but it doesn't allow searching by mod. But it turns out that all the maps in MWLL start with TC_ or TSA_, and you can search by that.

2011-06-27 Update: As of the 0.5 release, there are now also Arena maps, which all start with SA_. So in GameTracker, you can find them *and* the TSA maps with the same search string. URLs below are updated. 

This results in the following two URLs to find all the servers in Crysis Wars:

http://www.gametracker.com/search/warhead/?search_by=map&query=TC_&sort=c_numplayers&order=DESC
http://www.gametracker.com/search/warhead/?search_by=map&query=SA_&sort=c_numplayers&order=DESC

There are almost no hits for Crysis, but here they are anyway:

http://www.gametracker.com/search/crysis/?search_by=map&query=TC_
http://www.gametracker.com/search/crysis/?search_by=map&query=SA_

Next step: extract this data from the website and re-present it. Or do a Javascript hack over the results. Write a script to monitor favourite servers for players and notify. Or any number of things. But this will allow me to poll the servers and jump in when I have a moment :)